
S.A.F.E. VMware DOCUMENTATION
Appliance Details:
- OS: Ubuntu JeOS 8.04 Latest updates as of April 23 2008
- PHP Version 5.2.4
- Apache Version 2.2.8
- MySQL Version 5.0.51
- Snort Version 2.8.1
- Firewall used: apf-0.9.6
Connection Info:
- Network Info: Static IP set to 192.168.5.110
- Web Server listens on port 443 (HTTPS) only
- Shell Login: username: safe, password: pass2cng
File Locations:
- SAFE: /var/www
- Snort: /usr/local/bin
- Snort Rules: /usr/local/etc/snort/rule
User Information:
Username: safe
Password: pass2cng
Configuring your network Interface.
By default the SAFE appliance comes with a static IP address of 192.168.5.110. To change this, you will need to login as root.
Begin by assigning the root user a password. Login to the SAFE appliance using Putty or through the VMware application itself using the username ‘safe’ and the password ‘pass2cng’.
Next, type the following commands:
sudo passwd su
Followed by the new ‘root’ user password. From now on, to gain root access, you just need to run:
su
Now we can change the default IP address. From the terminal issue the following:
vim /etc/network/interfaces

Next, change the address, netmask, network, broadcast and gateway to match your network configuration.
When you are done, just hit ESC followed by :wq to save.
Restart your network to apply the new settings:
/etc/init.d/networking restart
Browsing the SAFE Appliance
Supported browsers:
- Internet Explorer 6.x, 7.x
- Firefox
- Safari (works but not fully tested)
Use https to connect to the safe web page. You will get a warning message from the browser about the security certificate. This is normal since the certificate was self signed. Just click to continue to the web page.
Purging Event Data
There are two ways to purge event data. You can purge all of the data in the database by going to the Configuration page and clicking on the “Purge All Events”
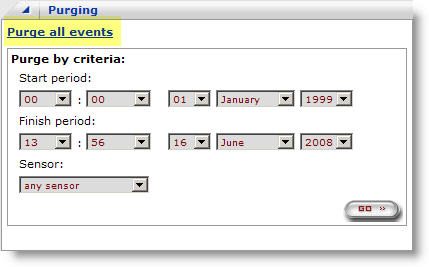
You can also set a Start Period and Finish Period to delete Events based on time frame.
You also have the option to delete individual events. This can be done by going to the Events page and to the far right of the Event, you will find the delete icon.
![]()
Click it once to delete the Event.
Filtering on Events
On the events page, you can filter on Events by a number of different values.
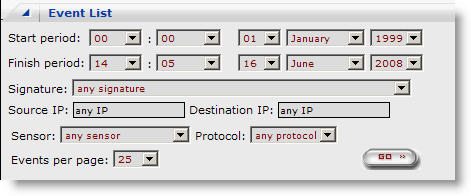
Start Period: Fill in the Time/Date that you would like to filter on when the event started.
Finish Period: Fill in the Time/Date that you would like to filter on when the event finished.
Signature: Sort by any snort signature or one specific snort signature.
Source IP: Address where the attack originated from.
Destination IP: Address where the attack targeted.
Sensor: Filter by Snort Sensor
Events per Page: Display number of Events for the page.
You can also auto fill in the data using the links to the right.

Clicking on the links will auto fill in the data in the filtering form.
Adding Snort Sensors
S.A.F.E. does not limit the number of snort sensors you can use. By default there is a firewall enabled to block access to the MySQL port. To enable access, there are a couple methods.
You can edit the firewall configuration script and add port 3306 to the accept list. To do this from the shell, first sudo to root.
![]()
Enter your root password and hit return.
Next, change directory into /etc/apf and edit the file conf.apf
![]()
Locate the line:
![]()
Hit the ‘i’ key to insert and add 3306 after 443, so it should look like this.
![]()
Next hit ESC wq to write the changes.
Last, from the shell inside the /etc/apf folder, reload the firewall
#apf -r
With this setup, the appliance will accept any tcp port 3306 traffic. If you don’t this type of filtering, you can also input a rule to allow port 3306 traffic from specific IP(s). To accomplish this, make sure that port 3306 is not in the inbound TCP port list in the file conf.apf.
Next, you will want to edit the following file: (allow_hosts.rules)
![]()
Go to the bottom of the file and add a line. Hit the ‘i’ key to go into insert mode.

Add the line similar to the above example, replacing your s=1.1.1.1 with your own IP address. To add multiple rules, just create a new line and duplicate the same rule with the different IP address
Last, from the shell inside the /etc/apf folder, reload the firewall
#./apf -r
Graphs
On the graphs page, you have the options to chart out the following graph types
- Event History
- Top Signatures
- Top Intruders
- Top Targets
You can generate the reports based on time frame. You also have some quick links to input the some time frames.
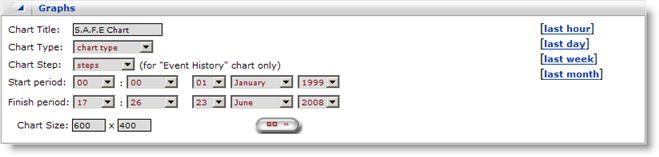
Chart Step is only used for the Event History Chart. You don’t need to configure this for any of the other chart types.
The reports are saved as images. To export these onto another document, just right click and save as.