

Motava Squid Reporting Appliance is a simple and feature rich Squid Reporting server all bundled into a vmware appliance to ease the deployment into your network.
Now Only $12
Features
- Rich web based application using PHP and YUI
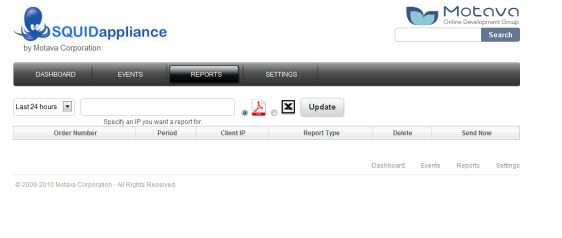
- Reporting (exporting to pdf and csv)
- Searching
- User Authentication
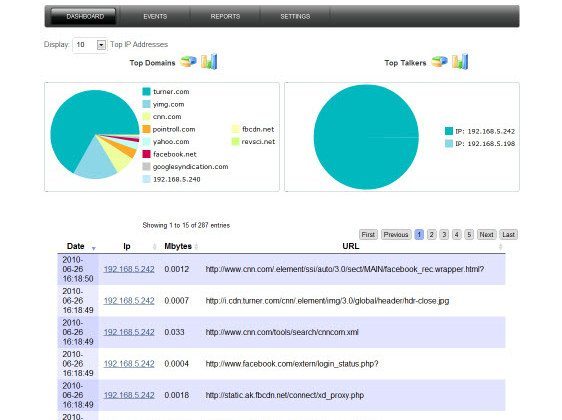
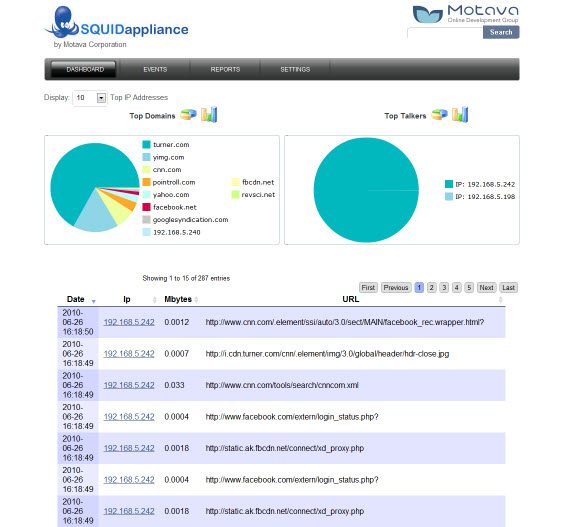
- Bar and Pie charts
Includes Squid Version 3.0 Stable19
NOTE: This does not include DansGuardian
Appliance Info
- OS: Ubuntu 10.04 Server Version
- Squid 3.0 Stable 19
- Webmin Version 1.510
- Apache Version 2.2.14
- PHP Version 5.3.2
Login Info
- OS Username: squid
- OS Password: motava
- Webmin Username: squid
- Webmin Password: motava
- Squid Reporter Username: admin
- Squid Reporter Password: admin
We have 2 different downloads available for purchase:
- .ovf version for ESX or ESXi installations
- vmdk version for vmware server 2.0 or vmware workstation 6.x +
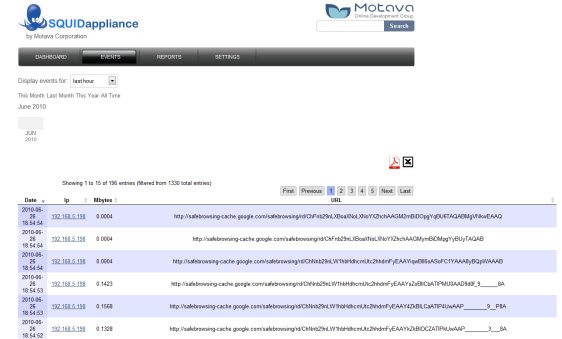
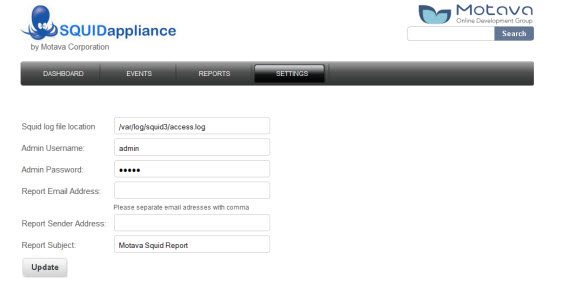
Screenshots
Dashboard
Events
Reporting
Settings
Requirements
Internet browser with Flash.
Windows server 2008 Hyper V (generation 1) and higher.
Installation to virtual environment:
For Hyper-V
Import using Hyper-V Manager
To import a virtual machine:
1. From the Actions menu in Hyper-V Manager, click Import Virtual Machine.
2. Click Next.
3. Select the folder that contains the exported files, and click Next.
4. Select the virtual machine to import.
5. Choose the import type, and click Next. (For descriptions, see Import types, below.)
6. Click Finish
For more details go to https://technet.microsoft.com/en-us/windows-server-docs/compute/hyper-v/deploy/export-and-import-virtual-machines
For VMware
1. In the VMware Infrastructure Client navigation pane, Select File > Deploy OVF Template. The Deploy OVF Template Wizard is displayed.
2. Deploy from file – Choose this option if the source OVF template is on the local file system.
3. Verify the template details that display and click Next
4. Specify the name and location for the deployed template and click Next.
5. Select a configuration option and click Next.
6. Select the host or cluster on which to run the deployed template, and click Next.
7. Select a resource pool, and click Next.
8. Select the datastore to which you want to store the virtual machine files, and click Next.
9. Map the networks used in the OVF template to networks in your inventory, by selecting the drop-down list in the Destination Networks column. Then click Next.
10. Verify the options you have specified and click Finish. The OVF template is deployed to your virtual machine.
For more details go to https://pubs.vmware.com/vsphere-4-esx-vcenter/index.jsp?topic=/com.vmware.vsphere.vmadmin.doc_41/vsp_vm_guide/working_with_ovf_templates/t_import_a_virtual_appliance.html
- Depends on your network topology you have to add 1 or 2 network adapters (Hyper-V legacy network adapters) or (VMware)
- As default 2 network adapters preconfigured like manual IP:
-eth0 192.168.15.102/24
-eth1 10.10.10.200/24 - You need to put your laptop on one of following networks and open Squid over browser.
Default user name and pass:
Username: admin
Pasword admin - Go to configuration seting and cheange ip on your network.
- Create forward and reverse records on your DNS server for squid.
- Create in your domain username squid.
- In activa directory and generate keytab. Generate keytab on windows DC by running “ktpass -out C:\squid.keytab -princ HTTP/squid.motava.local@MOTAVA.LOCAL -mapuser squid -pass Qwerty1 -ptype KRB5_NT_PRINCIPAL” ——motava.local this is exaple you need to put here your domain FQDN——–
- Upload keytab file over web.
- Test connection to domain controller via web configuration “Conection status”
- Important: Use host: Squid and port:3128 as configuration for user connection.
- After first start you have to wait 1 hour for appearance informations.
FAQ
- I imported the virtual machine into our inventory and started the squid appliance up, but I do not see an eth0 interface. This is common with vmware and the Ubuntu OS. To fix this, from the terminal, remove the following file:
#sudo rm -fr /etc/udev/rules.d/70-persistent-net.rules and reboot. - How can I access Webmin? You can access Webmin by going to https://1.1.1.1:10000 (replace 1.1.1.1 with your real IP address). Login using username squid and password motava